Azure Pipelines YAML allows us to create PaC (Pipeline as Code) to build and deploy applications to multiple stages e.g. Staging, Production.
To demonstrate this process I will cover the following:
- Build a simple web application with UI tests
- Publish the web application to an ACR (Azure Container Registry)
- Create an Azure Web App with IaC (Infrastructure as Code)
- Deploy the web application container to the Azure Web App
- Run basic UI tests on multiple stages
This article assumes that you are familiar with building YAML pipelines in Azure DevOps Pipelines.
The Web Application
For simplicity I have used the default ASP.NET Core Web Application in Visual Studio 2019 with Docker Support enabled for Linux to create the web application.

The only thing added to the default web application is a few UI tests using Selenium. You can find all the code used and the deployment files on my GitHub.
The Pipeline
After creating a new pipeline in Azure Pipelines, I need to configure the Azure and ACR connection variables in the pipeline UI.

If you need to know how to configure the ACR service connection see my previous article Configure ACR – Azure DevOps.
Build Image
Now everything is configured, I can create the initial YAML to build and push the application to an ACR.
As this will be a multistage pipeline I will create the first Stage to build and push the image.
trigger:
- master

resources:
- repo: self

variables:
  imageRepository: 'multistagepipelines'
  tag: '$(Build.BuildId)'
  vmImageName: 'ubuntu-latest'
  uiTestFolder: 'uitests'

stages:
- stage: Build
  displayName: Build and push stage
  jobs:
  - job: Build
    displayName: Build
    pool:
      vmImage: $(vmImageName)
    steps:
      - task: Docker@2
        displayName: Build and push an image to container registry
        inputs:
          containerRegistry: 'ACR Connection'
          repository: '$(imageRepository)'
          command: 'buildAndPush'
          Dockerfile: '**/Dockerfile'
          tags: |
            latest
            $(tag)
Now I can run this pipeline and see if it was successful.

And I can check the ACR in Azure to confirm the image has successfully been created.

Define the Web App
Now I have the image uploaded to the ACR, I need to define the Azure Web App that I will be deploying to.
For this I will use an ARM (Azure Resource Manager) template.
{
    "$schema": "https://schema.management.azure.com/schemas/2019-04-01/deploymentTemplate.json#",
    "contentVersion": "1.0.0.0",
    "parameters": {
        "siteName": {
            "type": "string",
            "metadata": {
                "description": "The unique name of your Web Site."
            }
        },
        "appImageName": {
            "type": "string",
            "metadata": {
                "description": "The name of the container image for this web app"
            }
        },
        "containerRegistryName": {
            "type": "string",
            "metadata": {
                "description": "The name of the azure container registry that contains the webapp"
            }
        },
        "containerRegistryUserName": {
            "type": "string",
            "metadata": {
                "description": "The user name to access the azure container registry"
            }
        },
        "containerRegistryPassword": {
            "type": "string",
            "metadata": {
                "description": "The password to access the azure container registry"
            }
        }

    },
    "variables": {
        "hostingPlanName": "[concat('hpn-',  parameters('siteName'))]",
        "siteApiVersion": "2019-08-01"
    },
    "resources": [
        {
            "type": "Microsoft.Web/serverfarms",
            "apiVersion": "[variables('siteApiVersion')]",
            "name": "[variables('hostingPlanName')]",
            "location": "[resourceGroup().location]",
            "properties": {
                "name": "[variables('hostingPlanName')]",
                "workerSizeId": "1",
                "reserved": true,
                "numberOfWorkers": "1"
            },
            "sku": {
                "Tier": "Standard",
                "Name": "S1"
            },
            "kind": "linux"
        },
        {
            "name": "[parameters('siteName')]",
            "type": "Microsoft.Web/sites",
            "apiVersion": "[variables('siteApiVersion')]",
            "kind": "app,linux,container",
            "location": "[resourceGroup().location]",
            "tags": {
                "hostingPlan": "[variables('hostingPlanName')]",
                "displayName": "[parameters('siteName')]"
            },
            "dependsOn": [
                "[variables('hostingPlanName')]"
            ],
            "properties": {
                "name": "[parameters('siteName')]",
                "serverFarmId": "[variables('hostingPlanName')]",
                "siteConfig": {
                    "use32BitWorkerProcess": false,
                    "http20Enabled": true,
                    "minTlsVersion": "1.2",
                    "alwaysOn": true,
                    "linuxFxVersion": "[concat('DOCKER|', parameters('appImageName'))]",
                    "appSettings": [
                        {
                            "name": "DOCKER_REGISTRY_SERVER_USERNAME",
                            "value": "[parameters('containerRegistryUserName')]"
                        },
                        {
                            "name": "DOCKER_REGISTRY_SERVER_URL",
                            "value": "[concat('https://',parameters('containerRegistryName'))]"
                        },
                        {
                            "name": "DOCKER_REGISTRY_SERVER_PASSWORD",
                            "value": "[parameters('containerRegistryPassword')]"
                        }
                    ]
                }
            }
        }
    ],
    "outputs": {}
}
There are few things to note in this template, firstly that we are deploying to a linux container so the website configuration is a little different to normal. The kind property needs to include more information than just app.
"kind": "app,linux,container"
And the reserved property must be set to true.
"reserved": true
There are also a couple of settings that aren’t really documented in the Microsoft Docs to configure the app settings to connect to the ACR to retrieve the image. Adding these appSettings will setup the connection.
"appSettings": [
 {
   "name": "DOCKER_REGISTRY_SERVER_USERNAME",
   "value": "[parameters('containerRegistryUserName')]"
 },
 {
   "name": "DOCKER_REGISTRY_SERVER_URL",
   "value": "[concat('https://',parameters('containerRegistryName'))]"
 },
 {
   "name": "DOCKER_REGISTRY_SERVER_PASSWORD",
   "value": "[parameters('containerRegistryPassword')]"
  }
]
Publish Template
The first thing to change in the pipeline is to add a step to upload the ARM template to an artifact to use later in the deployment.
Adding a PublishBuildArtifacts task to the build steps will perform the artifact creation.
- task: PublishBuildArtifacts@1
  displayName: Publish ARM template
  inputs:
    PathtoPublish: 'deploy.json'
    ArtifactName: 'template'
    publishLocation: 'Container'
Publish Tests
You may have noticed in the pipeline that I used “Jobs” and created a single job, this could be seen as unnecessary, but now I am going to add another job that will run in parallel with the Build Job.
So I need to add some tasks to build my UI tests. I’ve also added a variable “vmWindowsImageName” as for this job I am going to use a windows image. The test project is .NET Core 3.1 so I will use the DotNetCoreCLI tasks to restore packages and build the tests.
- job: BuildTests
  displayName: Build UI Tests
  pool:
    vmImage: $(vmWindowsImageName)
  steps:
    - task: DotNetCoreCLI@2
      displayName: Restore Packages
      inputs:
        command: 'restore'
        projects: 'multistagepipelinestests/*.csproj'
    - task: DotNetCoreCLI@2
      displayName: Build Tests
      inputs:
        command: 'build'
        projects: '**/multistagepipelinestests.csproj'
        arguments: '--configuration Release -o $(Build.ArtifactStagingDirectory)/uitests'
As with the ARM template, the UI tests need publishing to use later.
- task: PublishBuildArtifacts@1
  displayName: Publish UI Tests
  inputs:
    PathtoPublish: '$(Build.ArtifactStagingDirectory)/$(uiTestFolder)'
    ArtifactName: $(uiTestFolder)
    publishLocation: 'Container'
Deployment
Now the pipeline builds and publishes the necessary artifacts to the pipeline and the ACR, I can now add a new stage to deploy the application.
This new stage uses a special job, a ‘deployment’ job and uses a strategy. The Microsoft Docs have a lot of information about different strategies, for this I will use the ‘runonce’ strategy as the other strategies are not supported here.
- stage: Staging
  displayName: Deploy to Staging
  jobs:
  - deployment: DeployWeb
    displayName: Deploy Web App
    pool:
     vmImage: $(vmWindowsImageName)
    environment: Staging
    variables:
      siteName: staging-taz-app
      siteResourceGroup: stag-taz-webapp
      siteLocation: UK South
      appImageName: $(containerRegistryName)/$(imageRepository):latest
      baseSiteUrl: 'https://$(siteName).azurewebsites.net/'
    strategy:
      runOnce:
        deploy:
          steps:
With the job and strategy configured, I can now add the first step to execute the ARM template and create the Web App.
- task: AzureResourceManagerTemplateDeployment@3
    displayName: Create or Update Azure Web App
    inputs:
      deploymentScope: 'Resource Group'
      azureResourceManagerConnection: $(SubscriptionName)
      subscriptionId: $(subscriptionId)
      action: 'Create Or Update Resource Group'
      resourceGroupName: $(siteResourceGroup)
      location: $(siteLocation)
      templateLocation: 'Linked artifact'
      csmFile: '$(Pipeline.Workspace)/template/deploy.json'
      overrideParameters: '-siteName $(siteName) -appImageName $(appImageName) -containerRegistryName $(containerRegistryName) -containerRegistryUserName $(containerRegistryUserName) -containerRegistryPassword $(containerRegistryPassword)'
      deploymentMode: 'Incremental'
Once the Web App is created I can deploy the application container into the new Web App. As this is a container application I will use the AzureWebAppContainer task.
- task: AzureWebAppContainer@1
  displayName: Deploy Application
  inputs:
    azureSubscription: $(SubscriptionName)
    appName: '$(siteName)'
    containers: '$(appImageName)'
Once the app is deployed I can then run the UI tests, but first I’ll need to add a FileTranform task to make sure my settings file has the correct URL configured to run the tests against.
- task: FileTransform@2
  displayName: Configure Staging
  inputs:
    folderPath: '$(Pipeline.Workspace)'
    xmlTransformationRules: ''
    jsonTargetFiles: '**/*settings.json'
If you want to check that the settings file correctly transformed you can add a simple PowerShell task to output the file contents.
- task: PowerShell@2
  inputs:
    targetType: 'inline'
    script: 'Get-Content -Path $(Pipeline.Workspace)/$(uiTestFolder)/testsettings.json'
    pwsh: true
And now a task to run the UI tests, for this I will use the VSTest task to run and publish the test results to the Azure Pipeline UI.
- task: VSTest@2
  displayName: Run UI Tests
  inputs:
    testSelector: 'testAssemblies'
    testAssemblyVer2: |
      ***tests.dll
      !***TestAdapter.dll
      !**obj**
    searchFolder: '$(Pipeline.Workspace)/$(uiTestFolder)'
    uiTests: true
    testRunTitle: 'Basic UI Tests'
There have been a lot of changes added, so let’s see the full pipeline so far:
trigger:
- master

resources:
- repo: self

variables:
  imageRepository: 'multistagepipelines'
  tag: '$(Build.BuildId)'
  vmImageName: 'ubuntu-latest'
  vmWindowsImageName: 'windows-latest'
  uiTestFolder: 'uitests'

stages:
- stage: Build
  displayName: Build and push stage
  jobs:
  - job: Build
    displayName: Build
    pool:
      vmImage: $(vmImageName)
    steps:
      - task: Docker@2
        displayName: Build and push an image to container registry
        inputs:
          containerRegistry: 'ACR Connection'
          repository: '$(imageRepository)'
          command: 'buildAndPush'
          Dockerfile: '**/Dockerfile'
          tags: |
            latest
            $(tag)
      - task: PublishBuildArtifacts@1
        displayName: Publish ARM template
        inputs:
          PathtoPublish: 'deploy.json'
          ArtifactName: 'template'
          publishLocation: 'Container'
  - job: BuildTests
    displayName: Build UI Tests
    pool:
      vmImage: $(vmWindowsImageName)
    steps:
      - task: DotNetCoreCLI@2
        displayName: Restore Packages
        inputs:
          command: 'restore'
          projects: 'multistagepipelinestests/*.csproj'
      - task: DotNetCoreCLI@2
        displayName: Build Tests
        inputs:
          command: 'build'
          projects: '**/multistagepipelinestests.csproj'
          arguments: '--configuration Release -o $(Build.ArtifactStagingDirectory)/uitests'
      - task: PublishBuildArtifacts@1
        displayName: Publish UI Tests
        inputs:
          PathtoPublish: '$(Build.ArtifactStagingDirectory)/$(uiTestFolder)'
          ArtifactName: $(uiTestFolder)
          publishLocation: 'Container'
- stage: Staging
  displayName: Deploy to Staging
  jobs:
  - deployment: DeployWeb
    displayName: Deploy Web App
    pool:
     vmImage: $(vmWindowsImageName)
    environment: Staging
    variables:
      siteName: staging-taz-app
      siteResourceGroup: stag-taz-webapp
      siteLocation: UK South
      appImageName: $(containerRegistryName)/$(imageRepository):latest
      baseSiteUrl: 'https://$(siteName).azurewebsites.net/'
    strategy:
      runOnce:
        deploy:
          steps:
          - task: AzureResourceManagerTemplateDeployment@3
            displayName: Create or Update Azure Web App
            inputs:
              deploymentScope: 'Resource Group'
              azureResourceManagerConnection: $(SubscriptionName)
              subscriptionId: $(subscriptionId)
              action: 'Create Or Update Resource Group'
              resourceGroupName: $(siteResourceGroup)
              location: $(siteLocation)
              templateLocation: 'Linked artifact'
              csmFile: '$(Pipeline.Workspace)/template/deploy.json'
              overrideParameters: '-siteName $(siteName) -appImageName $(appImageName) -containerRegistryName $(containerRegistryName) -containerRegistryUserName $(containerRegistryUserName) -containerRegistryPassword $(containerRegistryPassword)'
              deploymentMode: 'Incremental'
          - task: AzureWebAppContainer@1
            displayName: Deploy Application
            inputs:
              azureSubscription: $(SubscriptionName)
              appName: '$(siteName)'
              containers: '$(appImageName)'
          - task: FileTransform@2
            displayName: Configure Staging
            inputs:
              folderPath: '$(Pipeline.Workspace)'
              xmlTransformationRules: ''
              jsonTargetFiles: '**/*settings.json'
          - task: VSTest@2
            displayName: Run UI Tests
            inputs:
              testSelector: 'testAssemblies'
              testAssemblyVer2: |
                ***tests.dll
                !***TestAdapter.dll
                !**obj**
              searchFolder: '$(Pipeline.Workspace)/$(uiTestFolder)'
              uiTests: true
              testRunTitle: 'Basic UI Tests'
Enhance the Pipeline
Currently the pipeline:
- Builds a web application image and uploads it to an ACR
- Deploys an Azure Web App using an ARM Template
- Deploys the image into the Azure Web App
- And runs UI tests against the newly deployed application
This is great but I would guess most of us don’t just have one environment that we need to deploy to and will need at least another one and maybe a manual intervention step too.
To create another environment I could just copy and paste the ‘Staging’ stage, rename it and update the variables. Whilst this approach would work, it would introduce a maintenance overhead we don’t want.
Fortunately Azure Pipelines YAML includes Templates for variables, jobs, steps and stages to handle this.
So, I will move the steps for the ‘Staging’ deployment into a template and call it web-deploy-steps.yml. The template file will look like:
steps:
- task: AzureResourceManagerTemplateDeployment@3
  displayName: Create or Update Azure Web App
  inputs:
    deploymentScope: 'Resource Group'
    azureResourceManagerConnection: $(SubscriptionName)
    subscriptionId: $(subscriptionId)
    action: 'Create Or Update Resource Group'
    resourceGroupName: $(siteResourceGroup)
    location: $(siteLocation)
    templateLocation: 'Linked artifact'
    csmFile: '$(Pipeline.Workspace)/template/deploy.json'
    overrideParameters: '-siteName $(siteName) -appImageName $(appImageName) -containerRegistryName $(containerRegistryName) -containerRegistryUserName $(containerRegistryUserName) -containerRegistryPassword $(containerRegistryPassword)'
    deploymentMode: 'Incremental'
- task: AzureWebAppContainer@1
  displayName: Deploy Application
  inputs:
    azureSubscription: $(SubscriptionName)
    appName: '$(siteName)'
    containers: '$(appImageName)'
- task: FileTransform@2
  displayName: Configure Staging
  inputs:
    folderPath: '$(Pipeline.Workspace)'
    xmlTransformationRules: ''
    jsonTargetFiles: '**/*settings.json'
- task: PowerShell@2
  inputs:
    targetType: 'inline'
    script: 'Get-Content -Path $(Pipeline.Workspace)/$(uiTestFolder)/testsettings.json'
    pwsh: true
- task: VSTest@2
  displayName: Run UI Tests
  inputs:
    testSelector: 'testAssemblies'
    testAssemblyVer2: |
      **\*tests.dll
      !**\*TestAdapter.dll
      !**\obj\**
    searchFolder: '$(Pipeline.Workspace)/$(uiTestFolder)'
    uiTests: true
    testRunTitle: 'Basic UI Tests'
Now I can update the ‘Staging’ stage to use the new template.
- stage: Staging
  displayName: Deploy to Staging
  jobs:
  - deployment: DeployWeb
    displayName: Deploy Web App
    pool:
     vmImage: $(vmWindowsImageName)
    environment: Staging
    variables:
      siteName: staging-taz-app
      siteResourceGroup: stag-taz-webapp
      siteLocation: UK South
      appImageName: $(containerRegistryName)/$(imageRepository):latest
      baseSiteUrl: 'https://$(siteName).azurewebsites.net/'
    strategy:
      runOnce:
        deploy:
          steps:
          - template: web-deploy-steps.yml
It is now easy to add another stage using the same steps. I’ll add a production stage and update the variables.
- stage: Production
  displayName: Deploy to Production
  jobs:
  - deployment: DeployWeb
    displayName: Deploy Web App
    pool:
     vmImage: $(vmWindowsImageName)
    environment: Production
    variables:
      siteName: production-taz-app
      siteResourceGroup: prod-taz-webapp
      siteLocation: UK South
      appImageName: $(containerRegistryName)/$(imageRepository):latest
      baseSiteUrl: 'https://$(siteName).azurewebsites.net/'
    strategy:
      runOnce:
        deploy:
          steps:
          - template: web-deploy-steps.yml
The full pipeline with the template now looks like:
trigger:
- master

resources:
- repo: self

variables:
  imageRepository: 'multistagepipelines'
  tag: '$(Build.BuildId)'
  vmImageName: 'ubuntu-latest'
  vmWindowsImageName: 'windows-latest'
  uiTestFolder: 'uitests'

stages:
- stage: Build
  displayName: Build and push stage
  jobs:
  - job: Build
    displayName: Build
    pool:
      vmImage: $(vmImageName)
    steps:
      - task: Docker@2
        displayName: Build and push an image to container registry
        inputs:
          containerRegistry: 'ACR Connection'
          repository: '$(imageRepository)'
          command: 'buildAndPush'
          Dockerfile: '**/Dockerfile'
          tags: |
            latest
            $(tag)
      - task: PublishBuildArtifacts@1
        displayName: Publish ARM template
        inputs:
          PathtoPublish: 'deploy.json'
          ArtifactName: 'template'
          publishLocation: 'Container'
  - job: BuildTests
    displayName: Build UI Tests
    pool:
      vmImage: $(vmWindowsImageName)
    steps:
      - task: DotNetCoreCLI@2
        displayName: Restore Packages
        inputs:
          command: 'restore'
          projects: 'multistagepipelinestests/*.csproj'
      - task: DotNetCoreCLI@2
        displayName: Build Tests
        inputs:
          command: 'build'
          projects: '**/multistagepipelinestests.csproj'
          arguments: '--configuration Release -o $(Build.ArtifactStagingDirectory)/uitests'
      - task: PublishBuildArtifacts@1
        displayName: Publish UI Tests
        inputs:
          PathtoPublish: '$(Build.ArtifactStagingDirectory)/$(uiTestFolder)'
          ArtifactName: $(uiTestFolder)
          publishLocation: 'Container'
- stage: Staging
  displayName: Deploy to Staging
  jobs:
  - deployment: DeployWeb
    displayName: Deploy Web App
    pool:
     vmImage: $(vmWindowsImageName)
    environment: Staging
    variables:
      siteName: staging-taz-app
      siteResourceGroup: stag-taz-webapp
      siteLocation: UK South
      appImageName: $(containerRegistryName)/$(imageRepository):latest
      baseSiteUrl: 'https://$(siteName).azurewebsites.net/'
    strategy:
      runOnce:
        deploy:
          steps:
          - template: web-deploy-steps.yml
- stage: Production
  displayName: Deploy to Production
  jobs:
  - deployment: DeployWeb
    displayName: Deploy Web App
    pool:
     vmImage: $(vmWindowsImageName)
    environment: Production
    variables:
      siteName: production-taz-app
      siteResourceGroup: prod-taz-webapp
      siteLocation: UK South
      appImageName: $(containerRegistryName)/$(imageRepository):latest
      baseSiteUrl: 'https://$(siteName).azurewebsites.net/'
    strategy:
      runOnce:
        deploy:
          steps:
          - template: web-deploy-steps.yml
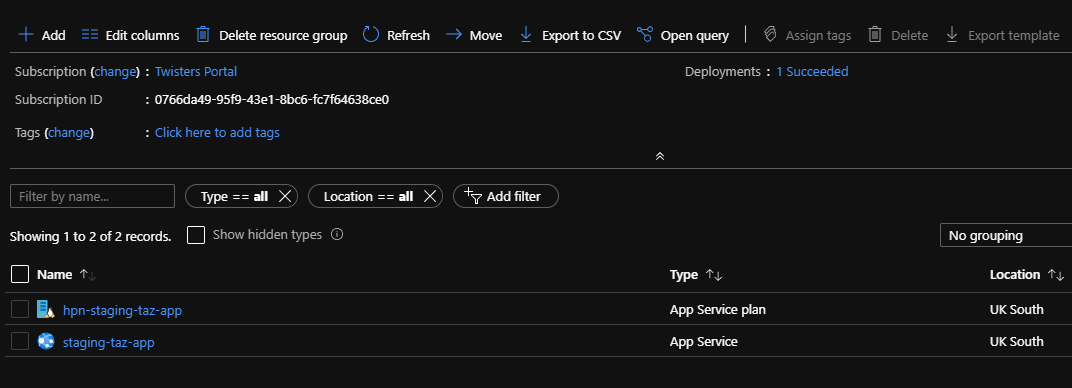
Review Output
Now the pipeline has ran, let’s check the results.


And let’s see if the resources were deployed into Azure.

Approvals and Checks
If the stage needs a manual intervention or approval step you can configure them in Azure Pipelines, just select ‘Environments’.

Once the list of environments is displayed you can select the one you need to add approvals and checks to e.g. Production.

Selecting the 3 dots on the right hand side and then selecting ‘Approvals and checks’ will allow a variety of options to be added.


There are a number of checks that can be added, here I will just select approvals.
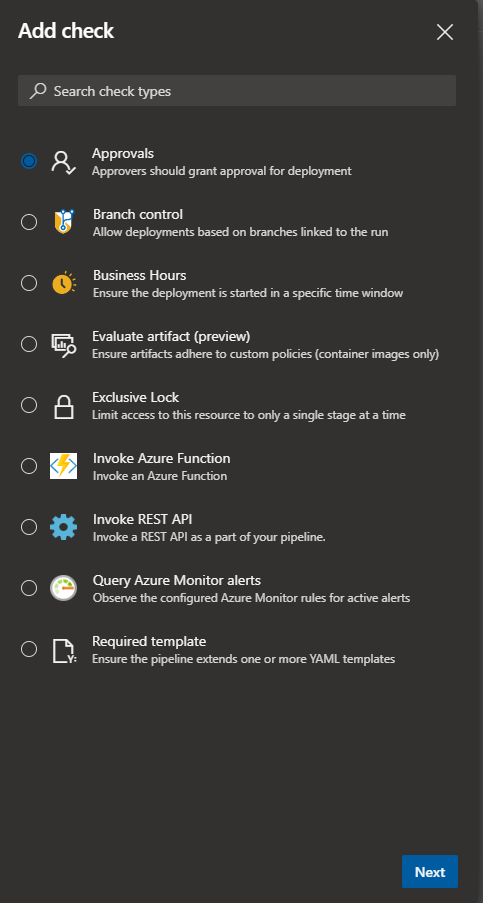
Approvals simply need the users or groups that can approve the stage you want to control.

There are a few more settings for approvals, how many need to approve, approval timeout, etc. but I am not going to go into detail about them.
Conclusion
Azure Pipelines YAML provides a flexible way to create build and deployment pipelines that can be source controlled. Changes can be approved, tracked and are visible to everyone instead of a change via a UI that goes unnoticed and difficult to track if there is a problem caused by a change.
Being able to control the full application deployment flow this way is very powerful and allows the whole team to understand how their application is built and deployed.

2 thoughts on “Azure Pipelines – Multistage YAML”
Comments are closed.