In a previous post I looked at Architecture Diagrams as Code with Structurizr DSL with one workspace and using puppeteer to generate images via an Azure Pipeline.
Since writing that post I’ve been using multiple workspaces and become more familiar with the structurizr-cli as well as using the docker images for structurizr-cli and structurizr-lite.
So, in this post I am going to look at:
- Using source control to store your diagrams in DSL format
- Editing diagrams locally
- Automation of pushing changes to one or more workspaces using Azure Pipelines or GitHub Actions
- Optionally generating SVG files for the workspaces that have changed as pipeline artifacts
Setup
Structurizr Workspaces
In Structurizr create the workspaces that you are going to use
The main reason to do this first is so that the ID, API Keys and API Secrets are created and can be copied from each of the workspace settings to add to the pipeline variables, the ID can be used for naming the folders if you choose to
GitHub/Azure DevOps
Now in GitHub or Azure DevOps create a new repository that you are going to use to put your diagrams in. Once that has been created, clone the repository and then create a folder for each workspace you have in Structurizr either using the Workspace Id (from the workspace settings) or with a name that has no spaces, starts with a letter and only contains alphanumeric characters ([a-z], [A-Z], [0-9]) or underscores (_).
Note: The folder name is used by the Pipeline to find the correct secrets to publish the workspace to Structurizr
Edit Diagrams
To get started create a workspace.dsl file in the folder you want to create a diagram in.
Note: You will do this for each workspace
To edit the diagrams locally you can use any text editor but I recommend using Visual Studio Code along with the extension by Ciaran Treanor for code highlighting and use Structurizr Lite to view the diagram. Simon Brown has a great post on Getting started with Structurizr Lite and don’t forget to install Docker if you haven’t already
In your editor create the diagram e.g.

Tip: The DSL reference is very handy when creating diagrams
Using Structurizr lite the diagram can be viewed without having to upload to the cloud. Run the following docker command replacing PATH with the path to the diagram you want to show
docker run -it --rm -p 8080:8080 -v PATH:/usr/local/structurizr structurizr/lite
In your browser navigate to localhost:8080 and you should see the diagram e.g. the above diagram looks like this
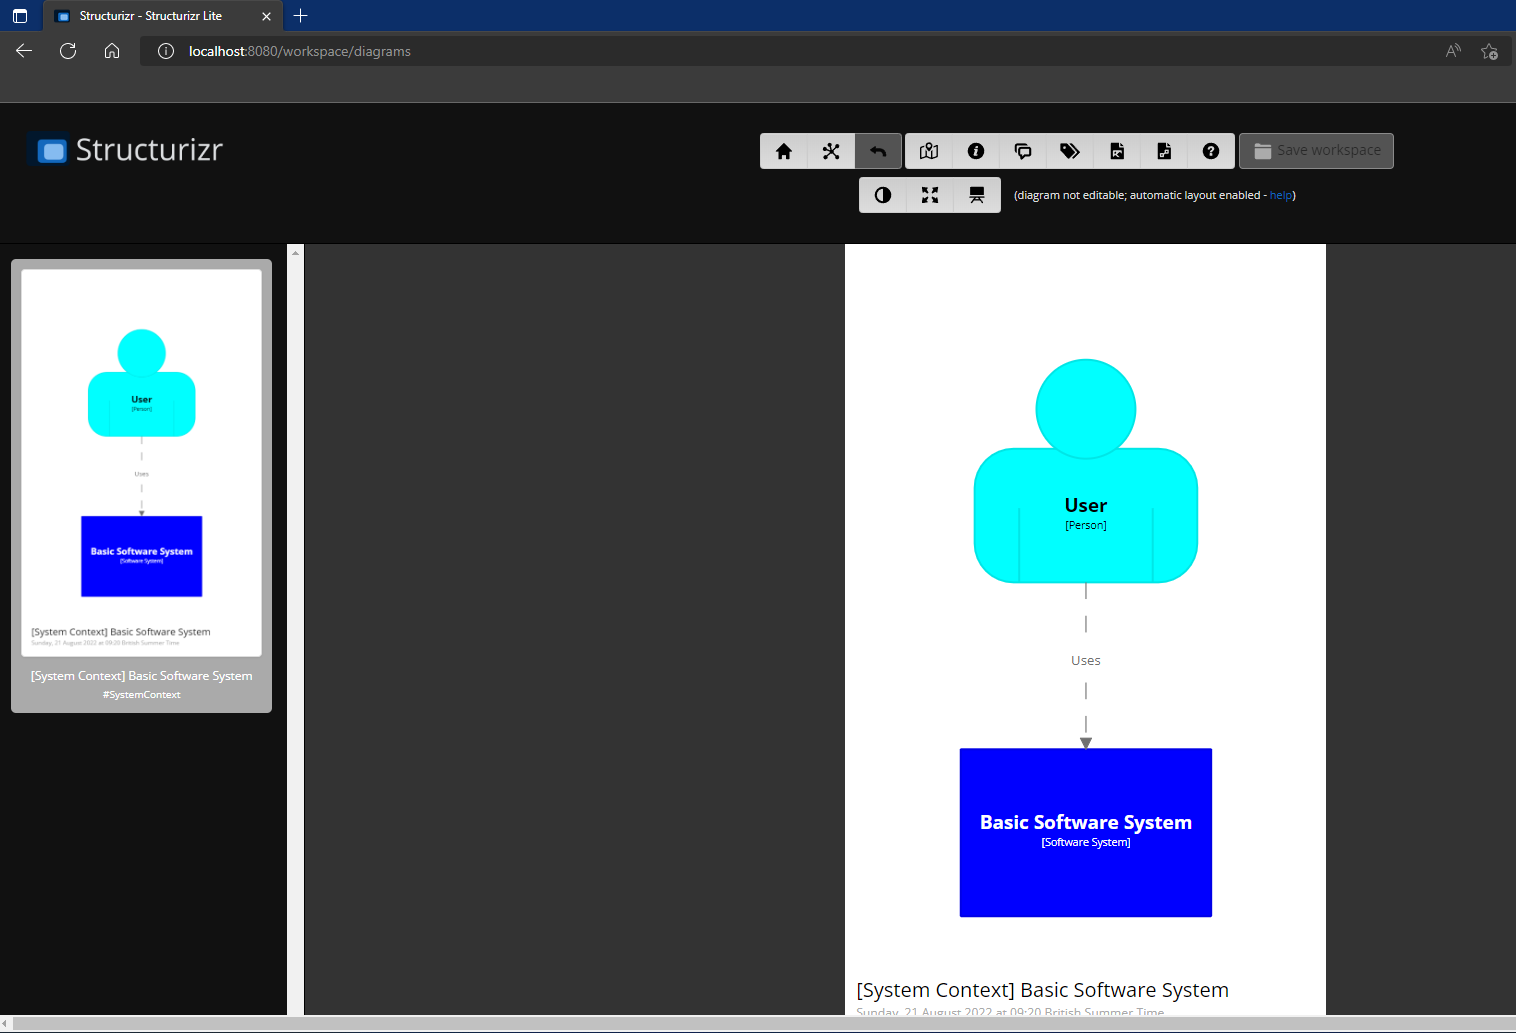
Tip: As you make changes to the diagram you can refresh the browser to see the changes
Note: Structurizr Lite only shows 1 workspace, if you have more and want to see those at the same time, run the Docker command as before but change the Port from 8080 to something else e.g. 8089 and change PATH to another diagram
docker run -it --rm -p 8089:8080 -v PATH:/usr/local/structurizr structurizr/lite
Once you are happy with the diagram changes they can be committed and pushed into the repository to share with others.
Pipelines
Now we have the diagrams in source control and can track the changes, we still want to push those changes to Structurizr to share with others who perhaps want to review the diagrams in Structurizr or see them in another application e.g. Atlassian Confluence
We can automate this process by creating a pipeline to publish diagrams to Structurizr when changes are made
Our pipeline has some requirements:
- Only run on the main branch
- Do not run on a Pull Request
- Only publish the diagrams that have been changed
- Optionally output an SVG of the changed diagram as artifacts
- Not include any Workspace Keys and Secrets in the source controlled pipeline files
Note: Secrets need to be in the format of WORKSPACE_<Type>_<Folder Name> e.g.
- WORKSPACE_ID_MYPROJECT
- WORKSPACE_KEY_MYPROJECT
- WORKSPACE_SECRET_MYPROJECT
Azure Pipelines
If you are using Azure Pipelines then read on or you can skip to the GitHub actions section.
So, let’s create the YAML file for the pipeline. In the root folder of your repository create a azure-pipelines.yml file and open that in an editor and add the following YAML
trigger:
  - main

pr: none

pool:
    vmImage: ubuntu-latest

parameters:
  - name: folderAsId
    type: boolean
    default: false
  - name: createImages
    type: boolean
    default: false

variables:
  downloadFolder: 'downloads'

steps:
The first step is to get the changes since the last push, this helps with the requirement of pushing only diagrams that have changed. Unlike GitHub actions there is not a pre-defined variable for this so this PowerShell script uses the Azure DevOps Rest API to obtain the git commit id before the changes and sets a variable to store the id for later use
- pwsh: |
    $devops_event_before = $env:BUILD_BUILDSOURCEVERSION
    $uri = "$env:SYSTEM_TEAMFOUNDATIONSERVERURI$env:SYSTEM_TEAMPROJECT/_apis/build/builds/$($env:BUILD_BUILDID)/changes?api-version=6.1"
    $changes = Invoke-RestMethod -Method Get -Headers @{ Authorization = "Bearer $env:SYSTEM_ACCESSTOKEN" } -Uri $uri -Verbose
    if ($changes.count -gt 0) {
      $firstCommit = $changes.value[$changes.count-1].id
      # Go back to the commit before the first change
      $devops_event_before = git rev-parse $firstCommit^
    }
    Write-Host $devops_event_before
    Write-Host "##vso[task.setvariable variable=DEVOPS_EVENT_BEFORE]$devops_event_before"
  displayName: 'Get Start Commit Id'
  env:
    SYSTEM_ACCESSTOKEN: $(System.AccessToken)
Next step is to optionally install Graphviz which is used to create the SVG files
- bash: |
    sudo apt-get install graphviz
  displayName: 'Install dependencies'
  condition: and(succeeded(), eq(${{ parameters.createImages }}, 'true'))
Now we can call a PowerShell script that will perform the publish action passing in the Workspace secrets as environment variables.
Note: Azure Pipelines automatically creates an Environment Variable for pipeline variables if they are not set a secrets (e.g. WORKSPACE_ID_MYPROJECT is not a secret). Once they are a secret they need to be explicitly added in the env property to be used inside the script as Environment Variables.
- task: PowerShell@2
  displayName: 'Publish Workspace'
  inputs:
    targetType: 'filePath'
    filePath: ./publish.ps1
    arguments: -StartCommitId $(DEVOPS_EVENT_BEFORE) -CommitId $(Build.SourceVersion) -DownloadFolder $(downloadFolder) -FolderAsId $${{ parameters.folderAsId }} -CreateImages $${{ parameters.createImages }}
  env:
    WORKSPACE_KEY_MYPROJECT: $(WORKSPACE_KEY_MYPROJECT)
    WORKSPACE_SECRET_MYPROJECT: $(WORKSPACE_SECRET_MYPROJECT)
    WORKSPACE_KEY_OTHERPROJECT: $(WORKSPACE_KEY_OTHERPROJECT)
    WORKSPACE_SECRET_OTHERPROJECT: $(WORKSPACE_SECRET_OTHERPROJECT)
Note: You may have noticed there is an additional $ on the parameters and think this is a typo but it’s actually a little hack, parameters of type boolean are really strings and so when passing to PowerShell you get an error that says it cannot convert a System.String to a System.Boolean adding a $ results in $true or $false and then is correctly read in by PowerShell
And the last step is to optionally upload the SVGs as artifacts if they were requested to be created
- publish: $(downloadFolder)
  displayName: Publish Diagrams
  artifact: 'architecture'
  condition: and(succeeded(), eq(${{ parameters.createImages }}, 'true'))
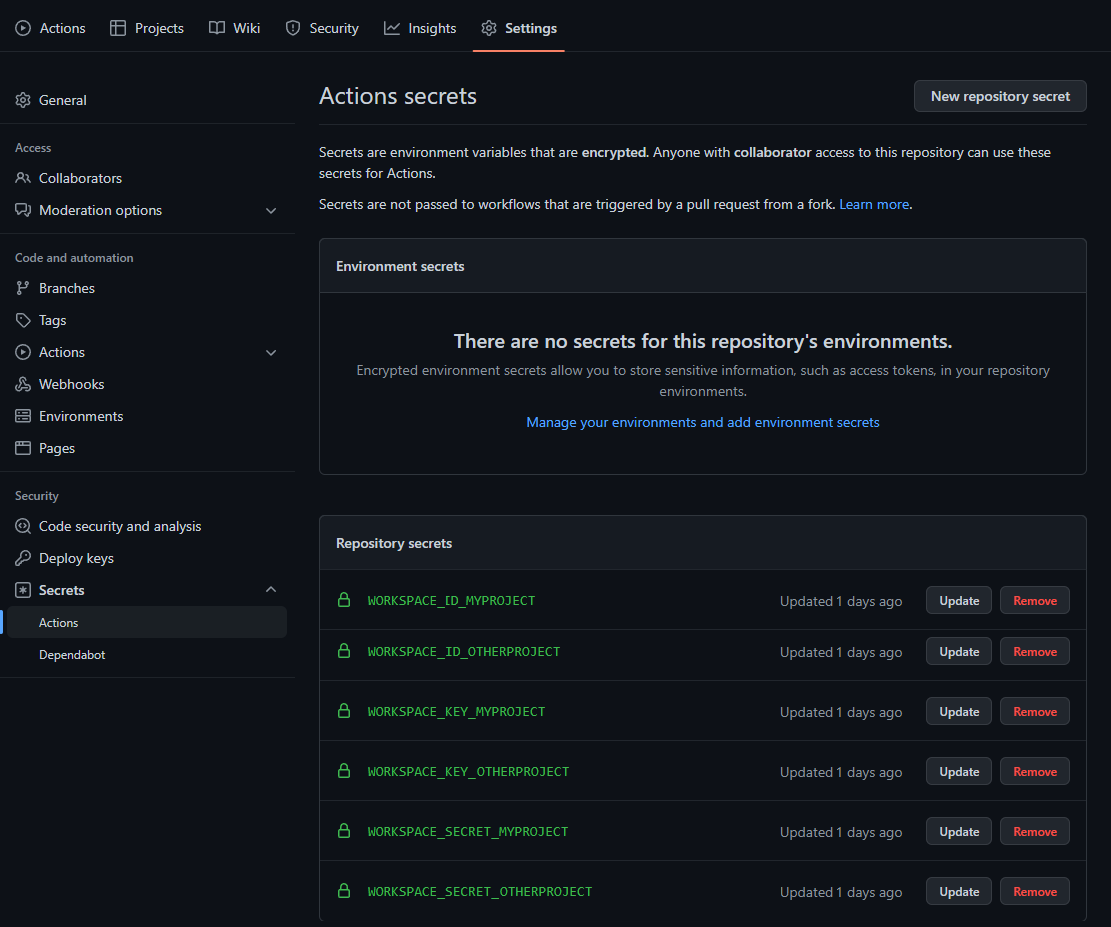
With the pipeline configured the next thing to do is add the secrets for each workspace using pipeline variables


You can also use variable groups but you need to update the variables section to load in a group e.g. if I had a group called structurizr_workspaces
variables:
  - name: downloadFolder
    value: 'downloads'
  - group: structurizr_workspaces
The final pipeline then is:
trigger:
  - main

pr: none

pool:
    vmImage: ubuntu-latest
parameters:
  - name: folderAsId
    type: boolean
    default: false
  - name: createImages
    type: boolean
    default: false

variables:
  downloadFolder: 'downloads'

steps:
- pwsh: |
    $devops_event_before = $env:BUILD_BUILDSOURCEVERSION
    $uri = "$env:SYSTEM_TEAMFOUNDATIONSERVERURI$env:SYSTEM_TEAMPROJECT/_apis/build/builds/$($env:BUILD_BUILDID)/changes?api-version=6.1"
    $changes = Invoke-RestMethod -Method Get -Headers @{ Authorization = "Bearer $env:SYSTEM_ACCESSTOKEN" } -Uri $uri -Verbose
    if ($changes.count -gt 0) {
      $firstCommit = $changes.value[$changes.count-1].id
      # Go back to the commit before the first change
      $devops_event_before = git rev-parse $firstCommit^
    }
    Write-Host $devops_event_before
    Write-Host "##vso[task.setvariable variable=DEVOPS_EVENT_BEFORE]$devops_event_before"
  displayName: 'Get Start Commit Id'
  env:
    SYSTEM_ACCESSTOKEN: $(System.AccessToken)
- bash: |
    sudo apt-get install graphviz
  displayName: 'Install dependencies'
  condition: and(succeeded(), eq(${{ parameters.createImages }}, 'true'))
- task: PowerShell@2
  displayName: 'Publish Workspace'
  inputs:
    targetType: 'filePath'
    filePath: ./publish.ps1
    arguments: -StartCommitId $(DEVOPS_EVENT_BEFORE) -CommitId $(Build.SourceVersion) -DownloadFolder $(downloadFolder) -FolderAsId $${{ parameters.folderAsId }} -CreateImages $${{ parameters.createImages }}
  env:
    WORKSPACE_KEY_MYPROJECT: $(WORKSPACE_KEY_MYPROJECT)
    WORKSPACE_SECRET_MYPROJECT: $(WORKSPACE_SECRET_MYPROJECT)
    WORKSPACE_KEY_OTHERPROJECT: $(WORKSPACE_KEY_OTHERPROJECT)
    WORKSPACE_SECRET_OTHERPROJECT: $(WORKSPACE_SECRET_OTHERPROJECT)
- publish: $(downloadFolder)
  displayName: Publish Diagrams
  artifact: 'architecture'
  condition: and(succeeded(), eq(${{ parameters.createImages }}, 'true'))
GitHub Actions
If you prefer to use GitHub actions instead of Azure Pipeline then let’s create the YAML file for the pipeline. Create a folder in your repository called .github\workflows and then create a ci.yml file in that folder and then open the ci.yml in an editor and add the following YAML
name: Structurizr Workspace Pipeline
on:
  push:
    branches: [ main ]
env:
  CREATE_IMAGES: ${{ false }}
  FOLDER_AS_ID: ${{ false }}

jobs:
  structurizr_workspace_pipeline:
    runs-on: ubuntu-latest
    steps:
Unlike Azure Pipelines the code is not automatically checked out so the first step is to checkout the code.
Note: although the fetch-depth is normally 1 this needs to be 0 to make sure we get all the changes on a push
- name: Checkout
   uses: actions/checkout@v3
   with:
     fetch-depth: 0
Next step is to optionally install Graphviz which is used to create the SVG files
- name: Install dependencies
  if: ${{ env.CREATE_IMAGES == 'true' }}
  run: sudo apt-get install graphviz
Now we need to get our secret variables into Environment Variables, unlike Azure Pipelines secrets can be added to Environment Variables and not have to be explicitly added to scripts in order to be used
- name: Create Secrets as Envs
   run: |
     while IFS="=" read -r key value
     do
       echo "$key=$value" >> $GITHUB_ENV
     done < <(jq -r "to_entries|map(\"\(.key)=\(.value)\")|.[]" <<< "$SECRETS_CONTEXT")
   env:
     SECRETS_CONTEXT: ${{ toJson(secrets) }}
As with Azure Pipelines we can call a PowerShell script that will perform the publish action
Note: the github.event.before pre-defined variable contains the start commit id
- name: Publish Workspace
   run: |
        ./publish.ps1 -StartCommitId ${{ github.event.before }} -CommitId ${{ github.sha }} -DownloadFolder 'downloads' -FolderAsId $${{ env.FOLDER_AS_ID }} -CreateImages $${{ env.CREATE_IMAGES }}
   shell: pwsh
Note: As with the Azure Pipeline the double $ hack to get a string into PowerShell as a boolean value
And the last step is to optionally upload the SVGs as artifacts if they were requested to be created
- name: Publish Diagrams
   if: ${{ env.CREATE_IMAGES == 'true' }}
   uses: actions/upload-artifact@v2
   with:
     name: architecture
     path: downloads
Now we have the GitHub action defined we now need to add the secrets for each workspace using Secrets in GitHub
The final pipeline then is:
name: Structurizr Workspace Pipeline
on:
  push:
    branches: [ main ]
env:
  CREATE_IMAGES: ${{ false }}
  FOLDER_AS_ID: ${{ false }}

jobs:
  structurizr_workspace_pipeline:
    runs-on: ubuntu-latest
    steps:
    - name: Checkout
      uses: actions/checkout@v3
      with:
        fetch-depth: 0
    - name: Install dependencies
      if: ${{ env.CREATE_IMAGES == 'true' }}
      run: sudo apt-get install graphviz
    - name: Create Secrets as Envs
      run: |
        while IFS="=" read -r key value
        do
          echo "$key=$value" >> $GITHUB_ENV
        done < <(jq -r "to_entries|map(\"\(.key)=\(.value)\")|.[]" <<< "$SECRETS_CONTEXT")
      env:
        SECRETS_CONTEXT: ${{ toJson(secrets) }}
    - name: Publish Workspace
      run: |
        ./publish.ps1 -StartCommitId ${{ github.event.before }} -CommitId ${{ github.sha }} -DownloadFolder 'downloads' -FolderAsId $${{ env.FOLDER_AS_ID }} -CreateImages $${{ env.CREATE_IMAGES }}
      shell: pwsh
    - name: Publish Diagrams
      if: ${{ env.CREATE_IMAGES == 'true' }}
      uses: actions/upload-artifact@v2
      with:
        name: architecture
        path: downloads
The PowerShell
As you may have noticed both pipelines run the same PowerShell script to publish the workspaces, this script detects the changes in each of the folders and pushes the workspace to structurizr using the cli and then optionally exports an svg file of the diagrams.
Note: The part of the script that looks for the changes in the Git commit is:
git diff-tree --no-commit-id --name-only --diff-filter=cd -r <commit id>
The –diff-filter is used to reduce what files to including in the diff, uppercase filters e.g. AD would only include Add and Delete where as using them in lowercase would exclude them. In this instance any Copied or Delete statuses are excluded.
The full script that is used looks like this:
<#
.SYNOPSIS
    PowerShell script to upload diagram changes to Structurizr Cloud

.DESCRIPTION
    This PowerShell script works out the changes between git commits where the files are of extension .dsl and upload to Structurizr Cloud
    and optionally creates SVG files of the changes

.PARAMETER StartCommitId
    The commit hash of the starting commit to look for changes

.PARAMETER CommitId
    The commit has of the end commit to look for changes

.PARAMETER DownloadFolder
    The folder to use as the download folder

.PARAMETER FolderAsId
    A boolean flag to denote if the Structurizr workspace ID is the folder name

.PARAMETER CreateImages
    A boolean flag to denote if SVG files should be created ready for upload

.EXAMPLE
    Example syntax for running the script or function
    PS C:\> ./publish.ps1 -StartCommitId $startCommitHash -CommitId $commitHash -DownloadFolder 'downloads' -FolderAsId $false CreateImages $false
#>

param (
    [Parameter(Mandatory)]
    [string]$StartCommitId,
    [Parameter(Mandatory)]
    [string]$CommitId,
    [Parameter(Mandatory)]
    [string]$DownloadFolder = 'downloads',
    [bool]$FolderAsId = $false,
    [bool]$CreateImages = $false
)

git diff-tree --no-commit-id --name-only --diff-filter=cd -r "$StartCommitId..$CommitId" | Where-Object { $_.EndsWith('.dsl') } | Foreach-Object {

    $filePath = ($_ | Resolve-Path -Relative) -replace "^./"
    $workspaceFolder = Split-Path -Path $filePath -Parent
    $workspaceFile = $filePath
    Write-Host "folder: $workspaceFolder"
    Write-Host "file: $workspaceFile"

    if ( $FolderAsId -eq $true ) {
        $workspaceIdValue = $workspaceFolder
    }
    else {
        $workspaceId = "WORKSPACE_ID_$($workspaceFolder)".ToUpper()
        $workspaceIdValue = (Get-item env:$workspaceId).Value
    }

    $workspaceKey = "WORKSPACE_KEY_$($workspaceFolder)".ToUpper()
    $workspaceKeyValue = (Get-item env:$workspaceKey).Value

    $workspaceSecret = "WORKSPACE_SECRET_$($workspaceFolder)".ToUpper()
    $workspaceSecretValue = (Get-item env:$workspaceSecret).Value

    docker run -i --rm -v ${pwd}:/usr/local/structurizr structurizr/cli push -id $workspaceIdValue -key $workspaceKeyValue -secret $workspaceSecretValue -workspace $workspaceFile
    $outputPath = "$DownloadFolder/$workspaceIdValue"
    if ( $CreateImages -eq $true ) {
        docker run --rm -v ${pwd}:/usr/local/structurizr structurizr/cli export -workspace $workspaceFile -format dot -output $outputPath
        sudo chown ${env:USER}:${env:USER} $outputPath

        Write-Host 'Convert exported files to svg'
        Get-ChildItem -Path $outputPath | Foreach-Object {
            $exportPath = ($_ | Resolve-Path -Relative)
            $folder = Split-Path -Path $exportPath -Parent
            $name = Split-Path -Path $exportPath -LeafBase

            Write-Host "Writing file: $folder/$name.svg"
            dot -Tsvg $exportPath > $folder/$name.svg
            rm $exportPath
        }
    }
}
Final Thoughts
I am big fan of using the C4 model and Structurizr and I hope sharing this idea of using a monorepo with multiple diagrams and automatically updating Structurizr via Pipeline has been a useful post.
Happy C4 diagramming 🙂
As always the example files, pipelines and script can be found in GitHub.


