MLOps

Build Event-Driven ML Pipelines with Argo Workflows

I’ve been diving into the world of MLOps lately, curious about how modern ML pipelines can be made more scalable and maintainable. Machine learning is so much more than just training a model, there’s data pre-processing, feature engineering, evaluation, deployment, and the ongoing need for everything to be reproducible.

As a DevOps engineer, I’ve spent years designing reliable workflows for CI/CD and infrastructure automation, but hadn’t explored how those same principles could apply to ML pipelines. That’s where Argo Workflows and Argo Events caught my attention. They’re lightweight, Kubernetes-native, and from what I’ve seen so far, they’re gaining real traction in the MLOps space.

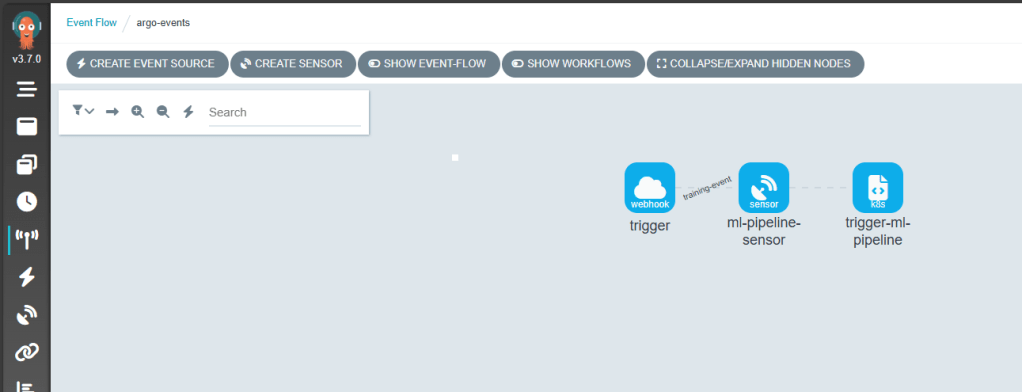
This post is my first hands-on look at these tools, setting up Argo Workflows and Argo Events on a local cluster with kind and exploring how they might enable event-driven, reproducible ML pipelines.

🧠Why Argo Workflows for MLOps?

Traditional ML pipelines are often stitched together using ad-hoc scripts, cron jobs, or heavy frameworks like Kubeflow. Argo Workflows offers a Kubernetes-native, lightweight alternative for orchestrating ML pipelines with:

  • Containerised tasks: Each step runs in its own container for reproducibility.
  • DAG-based workflows: Easily express complex pipelines with dependencies.
  • Event-driven triggers: With Argo Events, workflows can be launched automatically when new data arrives or other events occur.
  • Parallel execution: Fan-out tasks for hyperparameter tuning, multi-model training, or batch inference.
  • Retry strategies & exit handlers: Add robustness with built-in error handling and graceful exits.
  • Artifact management: Integrate with MinIO or volume mounts to persist model files, metrics, or datasets across steps.

Compared to tools like Kubeflow, Argo is simpler and less opinionated, making it easier to integrate with tools like MLflow, Seldon Core, etc. Its flexibility lets you tailor pipelines to your needs without locking into rigid frameworks.


🛠️Initial Setup

Here’s the setup I used for experimenting locally:

Create a kind Cluster

kind create cluster --name mlops-local

Install Argo Workflows

Run these commands to add it to the cluster:

kubectl create namespace argo
kubectl apply -n argo -f https://github.com/argoproj/argo-workflows/releases/latest/download/install.yaml

Install Argo Events

Run these commands to add it to the kind cluster:

kubectl create namespace argo-events
kubectl apply -f https://raw.githubusercontent.com/argoproj/argo-events/stable/manifests/install.yaml

With everything installed, let’s walk through building an event-driven pipeline step-by-step.

Setting Up Event-Driven Pipelines

The fun part of MLOps with Argo is how events can trigger workflows. Here’s a minimal example I tried using webhooks.

Define an EventBus

Once defined, load it into the kind cluster:

🔽📄eventbus.yaml
apiVersion: argoproj.io/v1alpha1
kind: EventBus
metadata:
  name: default
spec:
  nats:
    native:
      # minimum3.
      replicas: 3
      auth: token
kubectl apply -n argo-events -f eventbus.yaml

Roles and Service Account

You’ll need a role, rolebinding, and service account to allow Argo Events to trigger workflows.

🔽📄role.yaml
apiVersion: rbac.authorization.k8s.io/v1
kind: Role
metadata:
  name: argo-workflow-role
  namespace: argo-events
rules:
  - apiGroups: [""]
    resources: ["pods"]
    verbs: ["patch", "create", "get", "list", "watch", "delete"]
  - apiGroups: [""]
    resources: ["pods/log"]
    verbs: ["get", "list", "watch"]
  - apiGroups: ["argoproj.io"]
    resources: ["workflows"]
    verbs: ["create", "get", "list", "watch", "update", "patch", "delete"]
  - apiGroups: ["argoproj.io"]
    resources: ["workflows/finalizers"]
    verbs: ["update"]
  - apiGroups: ["argoproj.io"]
    resources: ["workflowtaskresults"]
    verbs: ["create","patch"]
  - apiGroups: [""]
    resources: ["configmaps"]
    verbs: ["get"]
  - apiGroups: [""]
    resources: ["serviceaccounts"]
    verbs: ["get"]
🔽📄rolebinding.yaml
apiVersion: rbac.authorization.k8s.io/v1
kind: RoleBinding
metadata:
  name: argo-workflowtaskresults-binding
  namespace: argo-events
roleRef:
  apiGroup: rbac.authorization.k8s.io
  kind: Role
  name:  argo-workflow-role
subjects:
  - kind: ServiceAccount
    name: operate-workflow-sa
    namespace: argo-events
🔽📄serviceaccount.yaml
apiVersion: v1
kind: ServiceAccount
metadata:
  name: operate-workflow-sa
  namespace: argo-events

With everything configured, load it into the kind cluster:

kubectl apply -n argo-events -f role.yaml
kubectl apply -n argo-events -f rolebinding.yaml
kubectl apply -n argo-events -f serviceaccount.yaml

Define a Webhook EventSource

This sets up a simple HTTP endpoint that triggers a workflow when called.

🔽📄event-source.yaml
apiVersion: argoproj.io/v1alpha1
kind: EventSource
metadata:
  name: webhook
  namespace: argo-events
spec:
  service:
    ports:
      - port: 12000
        targetPort: 12000
  webhook:
    trigger:
      port: "12000"
      endpoint: /trigger
      method: POST

Once defined, load it into your cluster:

kubectl apply -n argo-events -f event-source.yaml

Define a Sensor to Trigger Workflows

🔽📄sensor.yaml
apiVersion: argoproj.io/v1alpha1
kind: Sensor
metadata:
  name: ml-pipeline-sensor
  namespace: argo-events
spec:
  template:
    serviceAccountName: operate-workflow-sa
  dependencies:
    - name: training-event
      eventSourceName: webhook
      eventName: trigger
  triggers:
    - template:
        name: trigger-ml-pipeline
        k8s:
          operation: create
          source:
            resource:
              apiVersion: argoproj.io/v1alpha1
              kind: Workflow
              metadata:
                generateName: ml-pipeline-run-
              spec:
                workflowTemplateRef:
                  name: ml-pipeline-template
                arguments:
                  parameters:
                    - name: model
                      value: default-model
                    - name: dataset
                      value: default-dataset
          parameters:
            - src:
                dependencyName: training-event
                dataKey: body.model
              dest: spec.arguments.parameters.0.value
            - src:
                dependencyName: training-event
                dataKey: body.dataset
              dest: spec.arguments.parameters.1.value

Once defined, load it into your cluster:

kubectl apply -n argo-events -f sensor.yaml

Define a Workflow Template

This is a mock ML pipeline with train and evaluate steps with an example of using parameters

🔽📄workflowtemplate.yaml
apiVersion: argoproj.io/v1alpha1
kind: WorkflowTemplate
metadata:
  name: ml-pipeline-template
  namespace: argo-events
spec:
  entrypoint: pipeline
  serviceAccountName: operate-workflow-sa 
  templates:
    - name: pipeline
      dag:
        tasks:
          - name: train-model
            template: train
            arguments:
              parameters:
                - name: model
                  value: "{{workflow.parameters.model}}"
          - name: evaluate-model
            dependencies: [train-model]
            template: evaluate
            arguments:
              parameters:
                - name: dataset
                  value: "{{workflow.parameters.dataset}}"

    - name: train
      inputs:
        parameters:
          - name: model
      container:
        image: python:3.9
        command: ["python"]
        args: ["-c", "print('Training {{inputs.parameters.model}}...')"]

    - name: evaluate
      inputs:
        parameters:
          - name: dataset
      container:
        image: python:3.9
        command: ["python"]
        args: ["-c", "print('Evaluating {{inputs.parameters.dataset}}...')"]

Once defined, load it into your cluster:

kubectl apply -n argo-events -f workflowtemplate.yaml

📬Trigger Event

First expose the webhook so it can be actioned:

kubectl -n argo-events port-forward svc/webhook-eventsource-svc 12000:12000

Trigger it by sending a POST request via curl:

curl -d '{"model":"resnet","dataset":"imagenet"}' \
  -H "Content-Type: application/json" -X POST http://localhost:12000/trigger

👀Visualizing the Pipeline

Patch the argo-server for local access:

kubectl patch deployment argo-server --namespace argo --type='json' \
  -p='[{"op": "replace", "path": "/spec/template/spec/containers/0/args", "value": ["server","--auth-mode=server"]}]'

Then:

kubectl port-forward svc/argo-server -n argo 2746:2746

Navigate to https://localhost:2746 to visualise your pipeline. You should see the following configuration

Event Flow

Event Sources

Sensor

Workflow Templates

Workflow Runs


🌐Real-World MLOps Use Cases

This is where I see Argo Workflows + Events fitting into real ML pipelines:

  1. Event-Driven Model Training
  2. Continuous Model Evaluation (CME)
  3. ETL for ML Pipelines
  4. Model Deployment Automation

📚Further Reading & Resources

🚀 What’s Next

Argo Workflows and Argo Events have opened the door to scalable, event-driven ML pipelines, but there’s much more to explore:

📦 GitOps Delivery with ArgoCD

Pairing ArgoCD with Argo Workflows would enable declarative, version-controlled deployment of ML pipelines across environments. Imagine triggering new workflow templates from a Git commit and syncing changes automatically.

📡 Real-World Event Sources

How about connecting Argo Events to cloud-native services such as:

  • AWS SQS / SNS
  • Azure Service Bus
  • etc.

These integrations could allow upstream events to dynamically trigger ML pipelines.

🔧 Tool Integrations Ahead

What about adding further integration with popular tools:

  • MLflow – for experiment tracking and lifecycle management
  • KServe – to enable model serving within a Kubernetes-native stack
  • etc.

I hope this post sparked some ideas, go give Argo a spin and explore your own event-driven ML workflows!

DevOps, GitHub Actions, Security

Building Securely with Nuke.Build: Integrating Snyk Scans for .NET Projects

Introduction

As a .NET developer familiar with crafting CI/CD pipelines in YAML using platforms like Azure Pipelines or GitHub Actions, my recent discovery of Nuke.Build sparked considerable interest. This alternative offers the ability to build pipelines in the familiar C# language, complete with IntelliSense for auto-completion, and the flexibility to run and debug pipelines locally—a notable departure from the constraints of YAML pipelines, which often rely on remote build agents.

While exploring Nuke.Build’s developer-centric features, it became apparent that this tool not only enhances the developer experience but also provides an opportunity to seamlessly integrate security practices into the development workflow. As someone deeply invested in promoting developer-first application security, the prospect of incorporating security scans directly into the development lifecycle resonated strongly with me, aligning perfectly with my desire for rapid feedback on application security.

Given my role as a Snyk Ambassador, it was only natural to explore how I could leverage Snyk’s robust security scanning capabilities within the Nuke.Build pipeline to bolster the security posture of .NET projects.

In this blog post, I’ll demonstrate the creation of a pipeline using Nuke.Build and showcase the addition of Snyk scan capability, along with Software Bill of Materials (SBOM) generation. Through this proactive approach, we’ll highlight the ease of integrating a layer of security within the development lifecycle.

Getting Started

Following the Getting Started Guide on the Nuke.Build website, I swiftly integrated a build project into my solution. For the sake of simplicity, I opted to consolidate the .NET Restore, Build, and Test actions into a single target, along with adding a Clean target.

In Nuke.Build, a “target” refers to individual build steps that can be executed independently or in sequence. By combining multiple actions into a single target, I aimed to streamline the build process and eliminate unnecessary complexity.

The resulting build code looks like this:

using Nuke.Common;
using Nuke.Common.IO;
using Nuke.Common.ProjectModel;
using Nuke.Common.Tools.DotNet;

class Build : NukeBuild
{
    public static int Main() => Execute<Build>(x => x.BuildTestCode);

    [Parameter("Configuration to build - Default is 'Debug' (local) or 'Release' (server)")]
    readonly Configuration Configuration = IsLocalBuild ? Configuration.Debug : Configuration.Release;

    [Solution(GenerateProjects = true)] readonly Solution Solution;

    AbsolutePath SourceDirectory => RootDirectory / "src";
    AbsolutePath TestsDirectory => RootDirectory / "tests";

    Target Clean => _ => _
        .Executes(() =>
        {
            SourceDirectory.GlobDirectories("*/bin", "*/obj").DeleteDirectories();
        });

    Target BuildTestCode => _ => _
        .DependsOn(Clean)
        .Executes(() =>
        {
            DotNetTasks.DotNetRestore(_ => _
                .SetProjectFile(Solution)
            );
            DotNetTasks.DotNetBuild(_ => _
                .EnableNoRestore()
                .SetProjectFile(Solution)
                .SetConfiguration(Configuration)
                .SetProperty("SourceLinkCreate", true)
            );
            DotNetTasks.DotNetTest(_ => _
                .EnableNoRestore()
                .EnableNoBuild()
                .SetConfiguration(Configuration)
                .SetTestAdapterPath(TestsDirectory / "*.Tests")
            );
        });
}

Running nuke from my windows terminal built the solution and ran the tests.

Adding Security Scans

With the basic pipeline set up to build the code and run the tests, the next step is to integrate the Snyk scan into the pipeline. While Nuke supports a variety of CLI tools, unfortunately, Snyk is not among them.

To begin, you’ll need to create a free account on the Snyk platform if you haven’t already done so. Once registered, you can then install Snyk CLI using npm. If you have Node.js installed locally, you can install it by running:

npm install snyk@latest -g

Given that the Snyk CLI isn’t directly supported by Nuke, I turned to the Nuke documentation to explore possible solutions for running the CLI. Two options caught my attention: PowerShellTasks and DockerTasks.

To execute the necessary tasks for the Snyk scan, a few steps are required. These include authorizing a connection to Snyk, performing an open-source scan, potentially conducting a code scan, and generating a Software Bill of Materials (SBOM).

Let’s delve into each of these tasks using PowerShellTasks in Nuke. Firstly, let’s tackle authorization. The CLI command for authorization is:

snyk auth

Running this command typically opens a web browser to the Snyk platform, allowing you to authorize access. However, this method isn’t suitable for automated builds on a remote agent. Instead, we need to provide credentials. If you’re using a free account, your user will have an API Token available, which you can find on your account settings page under “API Token.” For enterprise accounts, you can create a service account specifically for this purpose.

To incorporate the Snyk Token into our application, let’s add a parameter to the code:

[Parameter("Snyk Token to interact with the API")] readonly string SnykToken;

Next, we’ll create a new target to execute the authorization command using PowerShellTasks and pass in the Snyk Token:

Target SnykAuth => _ => _
    .DependsOn(BuildTestCode)
    .Executes(() =>
    {          
        PowerShellTasks.PowerShell(_ => _
            .SetCommand("npm install snyk@latest -g")
        );
        PowerShellTasks.PowerShell(_ => _
            .SetCommand($"snyk auth {SnykToken}")
        );
    });

NOTE: This assumes that the build agent does not have the Snyk CLI installed

With authorization complete, our next task is to add a target for the Snyk Open Source scan, ensuring it depends on the Snyk Auth target:

 Target SnykTest => _ => _
    .DependsOn(SnykAuth)
    .Executes(() =>
    {
        // Snyk Test
        PowerShellTasks.PowerShell(_ => _
          .SetCommand("snyk test --all-projects --exclude=build")
        );
    });

Including the --all-projects flag ensures that all projects are scanned, which is good practice for .NET projects. Additionally, I’ve added an exclusion for the build project to focus the scan on application issues. I typically rely on Snyk Monitor attached to my GitHub Repo to detect issues in the entire repository, leaving this scan to concentrate solely on the application being deployed.

Finally, we need to update the Execute method to include the Snyk Test:

public static int Main() => Execute<Build>(x => x.BuildTestCode, x => x.SnykTest);

Running nuke again from the Windows terminal now prompts for Snyk authentication

Once authenticated

In order to prevent this we need to pass the API token value to nuke. It’s a good idea to set an environment variable for your API token e.g. with PowerShell

$env:snykApiToken = "<your api token>"
# or using the Snyk CLI
$env:snykApiToken = snyk config get api
# Run nuke passing in the parameter
nuke --snykToken $snykApiToken

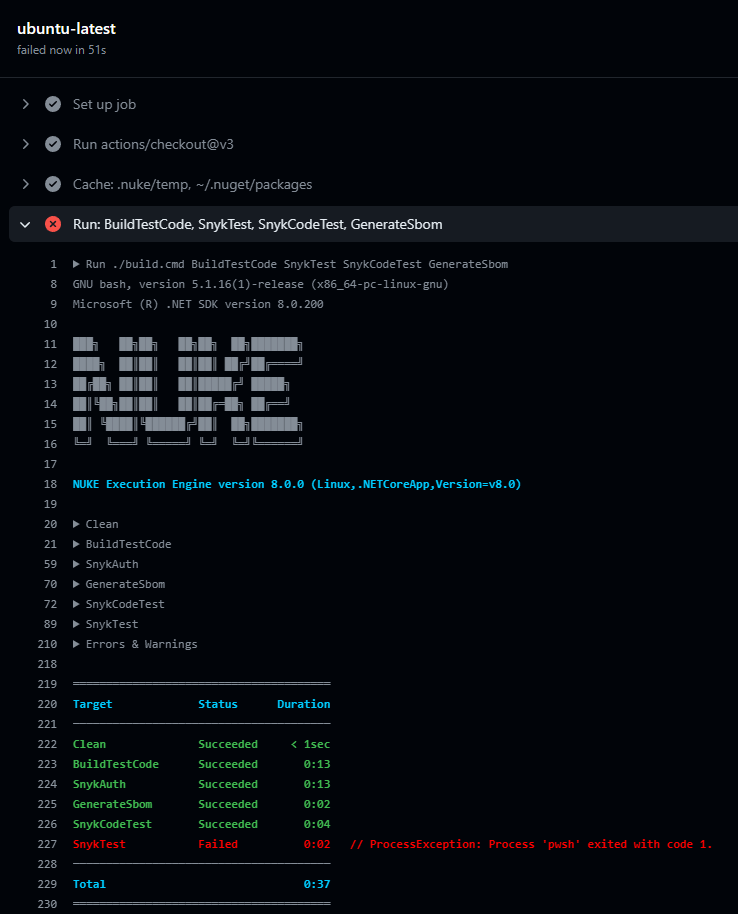
Upon executing the scan, it promptly identified several issues:

Subsequently, the Snyk Test failed, flagging vulnerabilities in the code and failing SnykTest:

To control whether the build fails based on the severity of vulnerabilities found, we can add another parameter:

 [Parameter("Snyk Severity Threshold (critical, high, medium or low)")] readonly string SnykSeverityThreshold = "high";

Ensure that the value has been set before using it. Note that the threshold must be in lowercase.

Target SnykTest => _ => _
    .DependsOn(SnykAuth)
    .Requires(() => SnykSeverityThreshold)
    .Executes(() =>
    {
        // Snyk Test
        PowerShellTasks.PowerShell(_ => _
          .SetCommand($"snyk test --all-projects --exclude=build --severity-threshold={SnykSeverityThreshold.ToLowerInvariant()}")
        );
    });

Now, let’s address running Snyk Code for a SAST scan, which will also need a parameter to control the severity threshold:

[Parameter("Snyk Code Severity Threshold (high, medium or low)")] readonly string SnykCodeSeverityThreshold = "high";

We’ll create another target for the Code test:

Target SnykCodeTest => _ => _
    .DependsOn(SnykAuth)
    .Requires(() => SnykCodeSeverityThreshold)
    .Executes(() =>
    {
        PowerShellTasks.PowerShell(_ => _
            .SetCommand($"snyk code test --all-projects --exclude=build --severity-threshold={SnykCodeSeverityThreshold.ToLowerInvariant()}")
        );
    });

Update the Execute method to include the code test:

public static int Main() => Execute<Build>(x => x.BuildTestCode, x => x.SnykTest, x => x.SnykCodeTest);

With the severity set for both scans, SnykTest continues to find high vulnerabilities, while SnykCodeTest passes:

To generate an SBOM (Software Bill of Materials) using Snyk and publish it as a build artifact, let’s add an output path:

AbsolutePath OutputDirectory => RootDirectory / "outputs";

And include a Produces entry to ensure the artifact is generated and stored in the specified directory:

Target GenerateSbom => _ => _
   .DependsOn(SnykAuth)
   .Produces(OutputDirectory / "*.json")
   .Executes(() =>
   {
       OutputDirectory.CreateOrCleanDirectory();
       PowerShellTasks.PowerShell(_ => _
           .SetCommand($"snyk sbom --all-projects --format spdx2.3+json --json-file-output={OutputDirectory / "sbom.json"}")
       );
   });

Lastly, update the Execute method to include the generation of the SBOM:

public static int Main() => Execute<Build>(x => x.BuildTestCode, x => x.SnykTest, x => x.SnykCodeTest, x => x.GenerateSbom);

Now, when executing Nuke, the SBOM will be generated and stored in the specified directory, ready to be published as a build artifact.

Earlier, I mentioned that PowerShellTasks and DockerTasks were both viable options for integrating the Snyk CLI into the Nuke build. Here’s how you can achieve the same tasks using DockerTasks:

using Nuke.Common.Tools.Docker;
...
  Target SnykTest => _ => _
     .DependsOn(BuildTestCode)
     .Requires(() => SnykToken, () => SnykSeverityThreshold)
     .Executes(() =>
     {
         // Snyk Test
         DockerTasks.DockerRun(_ => _
             .EnableRm()
             .SetVolume($"{RootDirectory}:/app")
             .SetEnv($"SNYK_TOKEN={SnykToken}")
             .SetImage("snyk/snyk:dotnet")
             .SetCommand($"snyk test --all-projects --exclude=build --severity-threshold={SnykSeverityThreshold.ToLowerInvariant()}")
         );
     });
 Target SnykCodeTest => _ => _
     .DependsOn(BuildTestCode)
     .Requires(() => SnykToken, () => SnykCodeSeverityThreshold)
     .Executes(() =>
     {
         DockerTasks.DockerRun(_ => _
             .EnableRm()
             .SetVolume($"{RootDirectory}:/app")
             .SetEnv($"SNYK_TOKEN={SnykToken}")
             .SetImage("snyk/snyk:dotnet")
             .SetCommand($"snyk code test --all-projects --exclude=build --severity-threshold={SnykCodeSeverityThreshold.ToLowerInvariant()}")
         );
     });
 Target GenerateSbom => _ => _
     .DependsOn(BuildTestCode)
     .Produces(OutputDirectory / "*.json")
     .Requires(() => SnykToken)
     .Executes(() =>
     {
         OutputDirectory.CreateOrCleanDirectory();
         DockerTasks.DockerRun(_ => _
             .EnableRm()
             .SetVolume($"{RootDirectory}:/app")
             .SetEnv($"SNYK_TOKEN={SnykToken}")
             .SetImage("snyk/snyk:dotnet")
             .SetCommand($"snyk sbom --all-projects --format spdx2.3+json --json-file-output={OutputDirectory.Name}/sbom.json")
         );
     });

NOTE: Snyk Auth is not required as a separate task as that is done inside the snyk container

Automating Nuke.Build with GitHub Actions: Generating YAML

Nuke comes with another useful feature: the ability to see a plan, which shows which targets are being executed and when. Simply running nuke --plan provides an HTML output of the plan:

With everything configured for local execution, it’s time to think about running this in a pipeline. Nuke supports various CI platforms, but for this demonstration, I’ll be using GitHub Actions. Nuke provides attributes to automatically generate the file to run the code:

using Nuke.Common.CI.GitHubActions;

[GitHubActions(
    "continuous",
    GitHubActionsImage.UbuntuLatest,
    On = new[] { GitHubActionsTrigger.Push },
    ImportSecrets = new[] { nameof(SnykOrgId), nameof(SnykToken), nameof(SnykSeverityThreshold), nameof(SnykCodeSeverityThreshold) },
    InvokedTargets = new[] { nameof(BuildTestCode), nameof(SnykTest), nameof(SnykCodeTest), nameof(GenerateSbom) })]
class Build : NukeBuild
...

To pass in the parameters for GitHub Actions, we’ll need to designate the token as a Secret:

[Parameter("Snyk Token to interact with the API")][Secret] readonly string SnykToken;

Next, let’s remove the default values for the threshold parameters:

[Parameter("Snyk Severity Threshold (critical, high, medium or low)")] readonly string SnykSeverityThreshold;
[Parameter("Snyk Code Severity Threshold (high, medium or low)")] readonly string SnykCodeSeverityThreshold;

We’ll then add the values from the .nuke/parameters.json file:

{
  "$schema": "./build.schema.json",
  "Solution": "Useful.Extensions.sln",
  "SnykSeverityThreshold": "high",
  "SnykCodeSeverityThreshold": "high"
}

Running Nuke again produces the following auto-generated output for GitHub Actions YAML in the folder .github/workflows/continuous.yml:

# ------------------------------------------------------------------------------
# <auto-generated>
#
#     This code was generated.
#
#     - To turn off auto-generation set:
#
#         [GitHubActions (AutoGenerate = false)]
#
#     - To trigger manual generation invoke:
#
#         nuke --generate-configuration GitHubActions_continuous --host GitHubActions
#
# </auto-generated>
# ------------------------------------------------------------------------------

name: continuous

on: [push]

jobs:
  ubuntu-latest:
    name: ubuntu-latest
    runs-on: ubuntu-latest
    steps:
      - uses: actions/checkout@v3
      - name: 'Cache: .nuke/temp, ~/.nuget/packages'
        uses: actions/cache@v3
        with:
          path: |
            .nuke/temp
            ~/.nuget/packages
          key: ${{ runner.os }}-${{ hashFiles('**/global.json', '**/*.csproj', '**/Directory.Packages.props') }}
      - name: 'Run: BuildTestCode, SnykTest, SnykCodeTest, GenerateSbom'
        run: ./build.cmd BuildTestCode SnykTest SnykCodeTest GenerateSbom
        env:
          SnykToken: ${{ secrets.SNYK_TOKEN }}
          SnykSeverityThreshold: ${{ secrets.SNYK_SEVERITY_THRESHOLD }}
          SnykCodeSeverityThreshold: ${{ secrets.SNYK_CODE_SEVERITY_THRESHOLD }}
      - name: 'Publish: outputs'
        uses: actions/upload-artifact@v3
        with:
          name: outputs
          path: outputs

This YAML file is automatically generated by Nuke and is ready to be used in your GitHub Actions workflow. It sets up the necessary steps to run your build, including caching dependencies, executing targets, and publishing artifacts.

NOTE: When I first committed the nuke build files, GitHub Actions gave me a permission denied error when running build.cmd. Running these commands and committing them got over that problem

git update-index --chmod=+x .\build.cmd
git update-index --chmod=+x .\build.sh

Here is the output of the GitHub Actions run for this pipeline

After fixing the vulnerabilities in my code, the workflow successfully passed:

Here’s the full C# source code for both PowerShell and Docker versions:

using Nuke.Common;
using Nuke.Common.CI.GitHubActions;
using Nuke.Common.IO;
using Nuke.Common.ProjectModel;
using Nuke.Common.Tools.DotNet;
using Nuke.Common.Tools.PowerShell;

[GitHubActions(
    "continuous",
    GitHubActionsImage.UbuntuLatest,
    On = new[] { GitHubActionsTrigger.Push },
    ImportSecrets = new[] { nameof(SnykToken), nameof(SnykSeverityThreshold), nameof(SnykCodeSeverityThreshold) },
    InvokedTargets = new[] { nameof(BuildTestCode), nameof(SnykTest), nameof(SnykCodeTest), nameof(GenerateSbom) })]
class Build : NukeBuild
{
    public static int Main() => Execute<Build>(x => x.BuildTestCode, x => x.SnykTest, x => x.SnykCodeTest, x => x.GenerateSbom);

    [Parameter("Configuration to build - Default is 'Debug' (local) or 'Release' (server)")]
    readonly Configuration Configuration = IsLocalBuild ? Configuration.Debug : Configuration.Release;

    [Parameter("Snyk Token to interact with the API")][Secret] readonly string SnykToken;
    [Parameter("Snyk Severity Threshold (critical, high, medium or low)")] readonly string SnykSeverityThreshold;
    [Parameter("Snyk Code Severity Threshold (high, medium or low)")] readonly string SnykCodeSeverityThreshold;

    [Solution(GenerateProjects = true)] readonly Solution Solution;

    AbsolutePath SourceDirectory => RootDirectory / "src";
    AbsolutePath TestsDirectory => RootDirectory / "tests";
    AbsolutePath OutputDirectory => RootDirectory / "outputs";

    Target Clean => _ => _
        .Executes(() =>
        {
            SourceDirectory.GlobDirectories("*/bin", "*/obj").DeleteDirectories();
        });

    Target BuildTestCode => _ => _
        .DependsOn(Clean)
        .Executes(() =>
        {
            DotNetTasks.DotNetRestore(_ => _
                .SetProjectFile(Solution)
            );
            DotNetTasks.DotNetBuild(_ => _
                .EnableNoRestore()
                .SetProjectFile(Solution)
                .SetConfiguration(Configuration)
                .SetProperty("SourceLinkCreate", true)
            );
            DotNetTasks.DotNetTest(_ => _
                .EnableNoRestore()
                .EnableNoBuild()
                .SetConfiguration(Configuration)
                .SetTestAdapterPath(TestsDirectory / "*.Tests")
            );
        });
    Target SnykAuth => _ => _
     .DependsOn(BuildTestCode)
     .Executes(() =>
     {
         PowerShellTasks.PowerShell(_ => _
             .SetCommand("npm install snyk@latest -g")
         );
         PowerShellTasks.PowerShell(_ => _
             .SetCommand($"snyk auth {SnykToken}")
         );
     });
    Target SnykTest => _ => _
        .DependsOn(SnykAuth)
        .Requires(() => SnykSeverityThreshold)
        .Executes(() =>
        {
            PowerShellTasks.PowerShell(_ => _
                .SetCommand($"snyk test --all-projects --exclude=build --severity-threshold={SnykSeverityThreshold.ToLowerInvariant()}")
            );
        });
    Target SnykCodeTest => _ => _
        .DependsOn(SnykAuth)
        .Requires(() => SnykCodeSeverityThreshold)
        .Executes(() =>
        {
            PowerShellTasks.PowerShell(_ => _
                .SetCommand($"snyk code test --all-projects --exclude=build --severity-threshold={SnykCodeSeverityThreshold.ToLowerInvariant()}")
            );
        });
    Target GenerateSbom => _ => _
        .DependsOn(SnykAuth)
        .Produces(OutputDirectory / "*.json")
        .Executes(() =>
        {
            OutputDirectory.CreateOrCleanDirectory();
            PowerShellTasks.PowerShell(_ => _
                .SetCommand($"snyk sbom --all-projects --format spdx2.3+json --json-file-output={OutputDirectory / "sbom.json"}")
            );
        });
}
using Nuke.Common;
using Nuke.Common.CI.GitHubActions;
using Nuke.Common.IO;
using Nuke.Common.ProjectModel;
using Nuke.Common.Tools.Docker;
using Nuke.Common.Tools.DotNet;

[GitHubActions(
    "continuous",
    GitHubActionsImage.UbuntuLatest,
    On = new[] { GitHubActionsTrigger.Push },
    ImportSecrets = new[] { nameof(SnykToken), nameof(SnykSeverityThreshold), nameof(SnykCodeSeverityThreshold) },
    InvokedTargets = new[] { nameof(BuildTestCode), nameof(SnykTest), nameof(SnykCodeTest), nameof(GenerateSbom) })]
class Build : NukeBuild
{
    public static int Main() => Execute<Build>(x => x.BuildTestCode, x => x.SnykTest, x => x.SnykCodeTest, x => x.GenerateSbom);

    [Parameter("Configuration to build - Default is 'Debug' (local) or 'Release' (server)")]
    readonly Configuration Configuration = IsLocalBuild ? Configuration.Debug : Configuration.Release;

    [Parameter("Snyk Token to interact with the API")][Secret] readonly string SnykToken;
    [Parameter("Snyk Severity Threshold (critical, high, medium or low)")] readonly string SnykSeverityThreshold;
    [Parameter("Snyk Code Severity Threshold (high, medium or low)")] readonly string SnykCodeSeverityThreshold;

    [Solution(GenerateProjects = true)] readonly Solution Solution;

    AbsolutePath SourceDirectory => RootDirectory / "src";
    AbsolutePath TestsDirectory => RootDirectory / "tests";
    AbsolutePath OutputDirectory => RootDirectory / "outputs";

    Target Clean => _ => _
        .Executes(() =>
        {
            SourceDirectory.GlobDirectories("*/bin", "*/obj").DeleteDirectories();
        });

    Target BuildTestCode => _ => _
        .DependsOn(Clean)
        .Executes(() =>
        {
            DotNetTasks.DotNetRestore(_ => _
                .SetProjectFile(Solution)
            );
            DotNetTasks.DotNetBuild(_ => _
                .EnableNoRestore()
                .SetProjectFile(Solution)
                .SetConfiguration(Configuration)
                .SetProperty("SourceLinkCreate", true)
            );
            DotNetTasks.DotNetTest(_ => _
                .EnableNoRestore()
                .EnableNoBuild()
                .SetConfiguration(Configuration)
                .SetTestAdapterPath(TestsDirectory / "*.Tests")
            );
        });
    Target SnykTest => _ => _
        .DependsOn(BuildTestCode)
        .Requires(() => SnykToken, () => SnykSeverityThreshold)
        .Executes(() =>
        {
            // Snyk Test
            DockerTasks.DockerRun(_ => _
                .EnableRm()
                .SetVolume($"{RootDirectory}:/app")
                .SetEnv($"SNYK_TOKEN={SnykToken}")
                .SetImage("snyk/snyk:dotnet")
                .SetCommand($"snyk test --all-projects --exclude=build --severity-threshold={SnykSeverityThreshold.ToLowerInvariant()}")
            );
        });
    Target SnykCodeTest => _ => _
        .DependsOn(BuildTestCode)
        .Requires(() => SnykToken, () => SnykCodeSeverityThreshold)
        .Executes(() =>
        {
            DockerTasks.DockerRun(_ => _
                .EnableRm()
                .SetVolume($"{RootDirectory}:/app")
                .SetEnv($"SNYK_TOKEN={SnykToken}")
                .SetImage("snyk/snyk:dotnet")
                .SetCommand($"snyk code test --all-projects --exclude=build --severity-threshold={SnykCodeSeverityThreshold.ToLowerInvariant()}")
            );
        });
    Target GenerateSbom => _ => _
        .DependsOn(BuildTestCode)
        .Produces(OutputDirectory / "*.json")
        .Requires(() => SnykToken)
        .Executes(() =>
        {
            OutputDirectory.CreateOrCleanDirectory();
            DockerTasks.DockerRun(_ => _
                .EnableRm()
                .SetVolume($"{RootDirectory}:/app")
                .SetEnv($"SNYK_TOKEN={SnykToken}")
                .SetImage("snyk/snyk:dotnet")
                .SetCommand($"snyk sbom --all-projects --format spdx2.3+json --json-file-output={OutputDirectory.Name}/sbom.json")
            );
        });
}

Final Thoughts

Nuke.Build is a great concept for performing build pipelines and it really helps to be able to run the pipeline locally and test it out, making sure paths and everything are correct. Couple that with the capability to generate GitHub Actions and other support CI pipelines to run the code is a big benefit.

Adding Security Scans to catch things early is another plus and I am glad that it’s possible to run those scans in multiple ways in Nuke, hopefully the Snyk CLI can be supported in Nuke directly in the future.

If you haven’t checked out Nuke yet, I would definitely give it a try and see the benefits for yourself.